
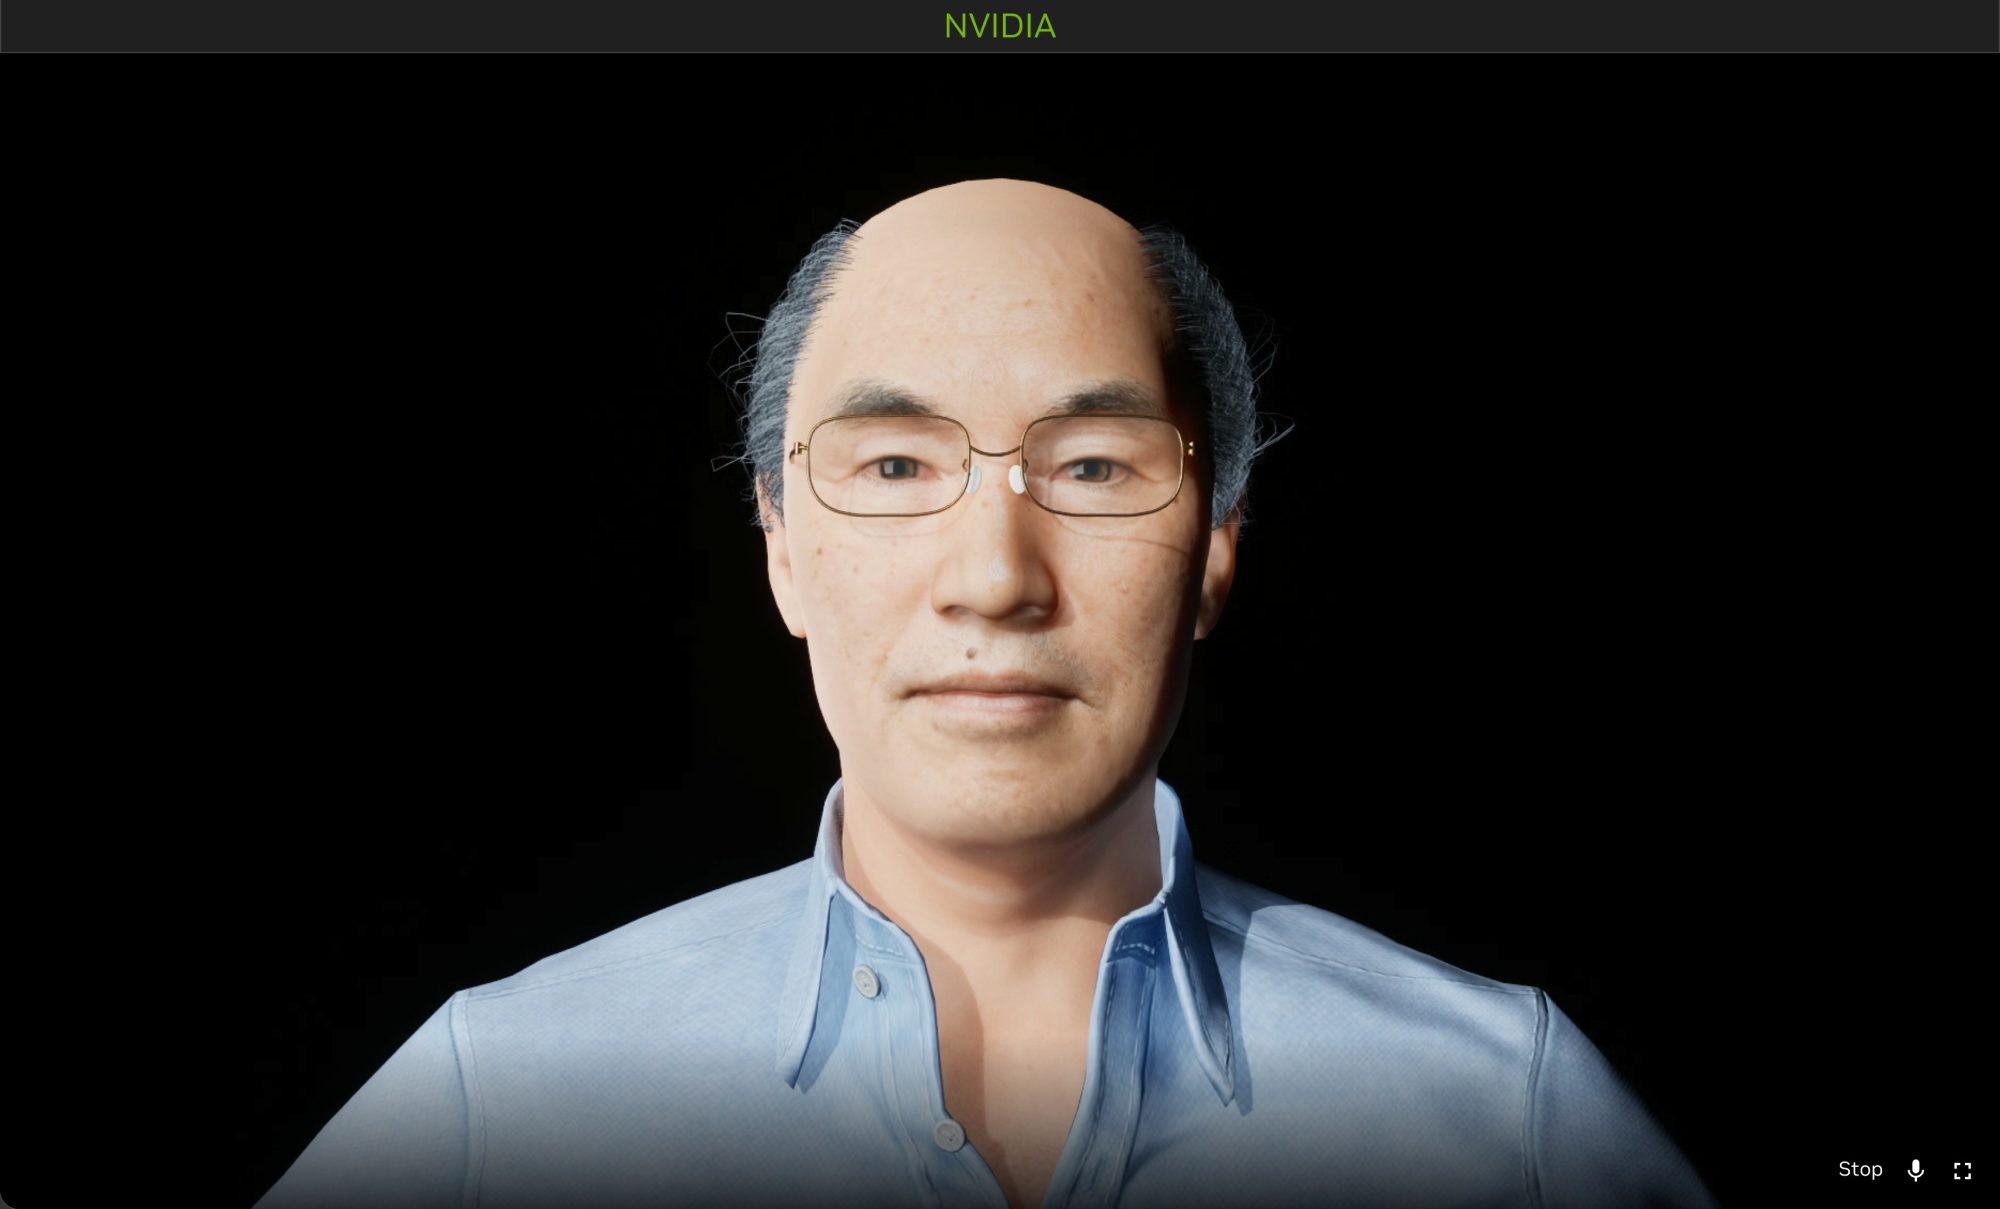
A conversational avatar starts with a reliable character asset, not with a running service. Before connecting speech and facial animation, we need a complete character, correctly reconstructed materials, and facial morph targets that the renderer can actually drive. [1] [2]
This first article explains how to prepare a Character Creator 5 (CC5) avatar for an Unreal Engine-based NVIDIA Tokkio workflow. We cover character preparation, FBX export, Reallusion Auto Setup import, and asset-level validation. The endpoint is a saved Unreal avatar and a documented handoff. A separate article by another contributor will cover ACE runtime integration, Tokkio configuration, packaging, deployment, and live-stream testing.
Scope of this guide: Character Creator 5 (CC5) avatar preparation, clean FBX/JSON export, Reallusion Auto Setup 2.02 import into Unreal Engine 5.5.4, and asset-level 52-morph target validation.
Downstream note: Tokkio ACE microservices, live audio streaming, and C++ runtime renderer implementation are covered in a dedicated follow-up article.
1. Define the deliverable before starting
The preparation pipeline follows strict checkpoints from asset creation to runtime handover. Each transition must be verified independently:
A good-looking character in CC5 does not prove that its exported textures resolve, and a clean Unreal viewport does not prove that facial animation targets were correctly imported.
For this article, “ready for integration” means that the complete character has been exported, imported, saved, reopened, and checked for the facial targets expected by the downstream mapping. It does not mean that Tokkio has been deployed or that speech-driven animation has been verified.
2. Agree on a compatible toolchain
In this implementation workflow, we use Unreal Engine 5.5.4 as the baseline, aligned with an ACE package specifically targeting Unreal Engine 5.5. This is a version-specific baseline, not a recommendation to combine any current CC5, Unreal, and ACE releases. Confirm the engine version with the integration owner before creating production assets.
For avatar authoring, prepare CC5, an Unreal Engine installation agreed with the integration owner, and an engine-compatible Reallusion Auto Setup package. Inspect plugin descriptors and the documentation bundled with the installed release rather than relying on a ZIP filename. Do not mix plugin binaries built for different Unreal minor versions. [2] [6]
Record the exact CC5 version, Unreal version, Auto Setup version, export directory, Unreal project path, skeletal mesh asset path, and the intended facial profile. For example, Reallusion Auto Setup 2.02 was verified in this pipeline; check your exact installed plugin version for compatibility. ACE renderer plugins and the build/deployment toolchain belong to the next stage, but their compatibility constraints should be agreed now to avoid re-importing into another engine version later.
3. Prepare the complete character in CC5
Finalize the character’s appearance before export, then check the component tree. Exporting only the base body can produce an apparently successful import while leaving important renderable parts behind. Confirm that the character includes its mesh and skeleton, clothing and required materials, eyes, teeth, tongue, tear ducts, and eyelashes. Review these parts together in the neutral pose.
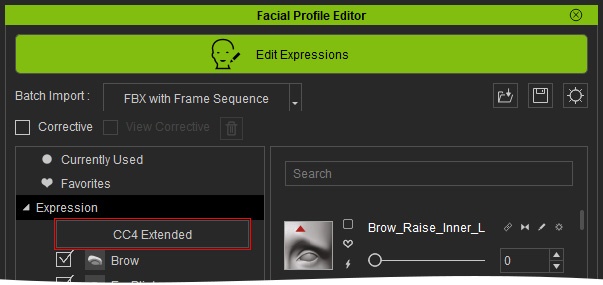
The facial profile is especially important. Use an Extended / ARKit-compatible facial profile with expressions available. In Character Creator, navigate to the Modify panel > Motion > Facial Profile Editor to verify that the Expression node explicitly reads “CC4 Extended”. Do not select a facial profile of None or standard profiles that omit ARKit-level micro-expressions. A character can render perfectly while lacking the shape changes needed for speech, blinking, or subtle emotive expressions. [3]
Keep the original topology for this reference workflow unless you have a separately validated reason to change it. Topology or facial-profile changes should trigger another morph-coverage check. Also decide whether the export contains the current pose or whether body animation will be delivered separately; do not leave that decision implicit. [4]
4. Export a complete FBX bundle
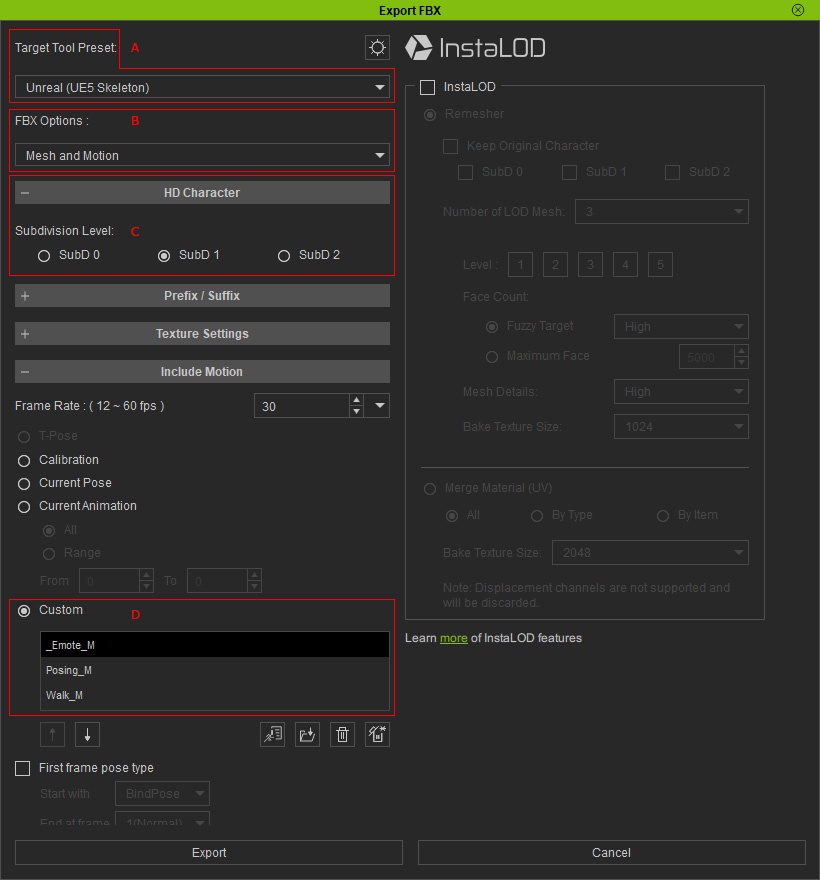
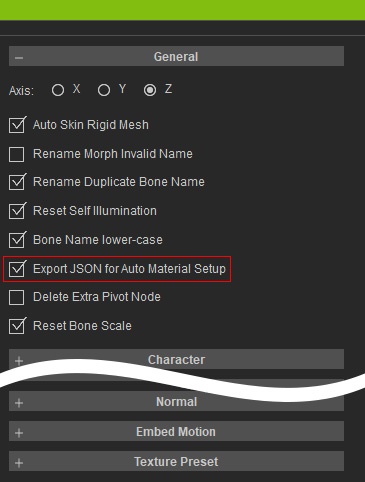
In CC5, open File → Export → FBX → Clothed Character and select the Unreal Engine preset—specifically setting the target tool preset to Unreal (UE5 Skeleton). Ensure the base reference pose is set to A-Pose (or the matching bind pose for the UE5 mannequin). Include the complete character, enable the required facial morphs, and export both textures and the Reallusion JSON sidecar. Keep Embed Textures disabled and verify that Export JSON for Auto Material Setup is enabled in the advanced settings. Leave InstaLOD / Remesher disabled; altering mesh topology at export time can disrupt morph vertex IDs and cause facial targets to deform incorrectly or fail during import. [4] [5]
The JSON sidecar is part of the asset, not optional housekeeping. Reallusion Auto Setup uses the accompanying metadata to reconstruct the intended material setup. Keep it next to the matching FBX, and preserve the relative texture paths generated during export. [4] [5]
This layout reflects Reallusion’s standard external export structure. When Embed Textures is disabled, Character Creator automatically splits textures between two locations: the CharacterName.fbm/ folder holds base color (diffuse) and normal maps, while the companion textures/ folder holds roughness, metallic, opacity, and ambient occlusion maps. The JSON sidecar maps all these relative paths for Unreal. The essential checks are that the FBX is non-empty, the JSON has the matching basename and parses successfully, and every texture referenced by the JSON exists at the resolved path. Keep both the .fbm and textures/ directories beside the FBX and JSON during transfer. [5]
Keep a small export record containing file paths, byte sizes, timestamps, and the results of the checks above. Fix missing files or broken references in the export bundle before importing. Copying only the FBX to another machine is not a complete handoff.
5. Prepare Unreal and Reallusion Auto Setup
Create or select the project using the agreed Unreal version. The complete reference implementation uses a C++ project for its later project-owned runtime actor. Asset preparation does not require implementing that actor in this article, but working in the intended project avoids unnecessary migration. Agree on a stable content location and skeletal mesh asset name with the integration owner.
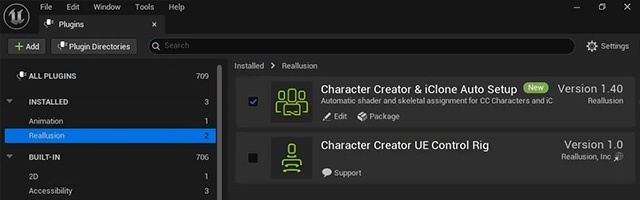
Install Reallusion Auto Setup following the guide bundled with that exact package. Preserve its Content subtree and RLPlugin directory structure; do not flatten or rename vendor folders. The reference project includes Plugins/RLPlugin/RLPlugin.uplugin, together with Content/CC_Shaders/ and Content/SSSProfile/. Treat these as reference paths and follow the installed package’s instructions if its layout differs. [6]
Enable the plugin and confirm that the editor starts without relevant plugin-load or compatibility errors. A plugin appearing in a folder is not enough: Unreal must load the correct build before you rely on its import behavior.
6. Import the character with its materials and morphs
Use the Reallusion Auto Setup import workflow with the exported FBX and matching JSON beside it. The companion JSON is discovered alongside the FBX. Keep Auto Setup enabled and choose the appropriate character and shader options for the installed release. The guide’s reference UI uses HQ Shader. Avoid treating a plain FBX-only import as equivalent to the metadata-driven workflow. [7]
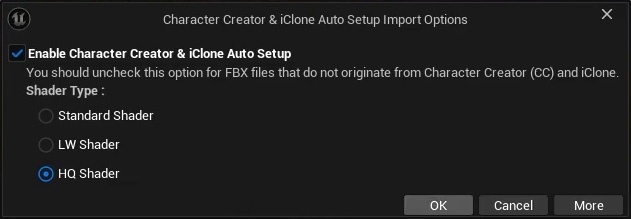
Control Rig is not required for the facial-asset preparation described here. Leave it disabled unless the project also needs that body-authoring workflow. When Unreal’s FBX import options appear, confirm the skeletal mesh and mesh-import settings, choose the appropriate skeleton context, and explicitly enable Import Morph Targets before selecting Import All. [7] [8]
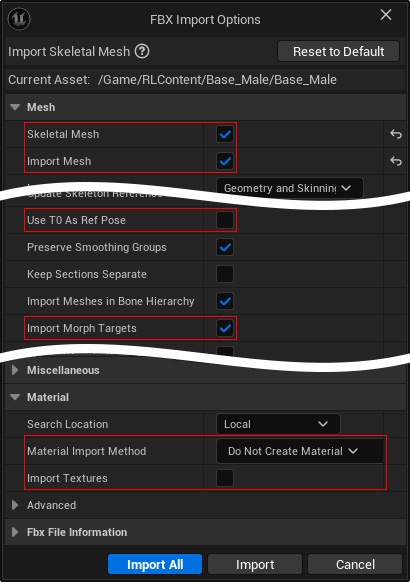
Wait for asset processing and shader compilation to finish before judging materials. Then inspect the skeletal mesh, skeleton, physics asset, materials and material instances, textures, subsurface-scattering profiles, and any facial/profile assets produced by the installed Auto Setup version. Save all imported packages. [7]
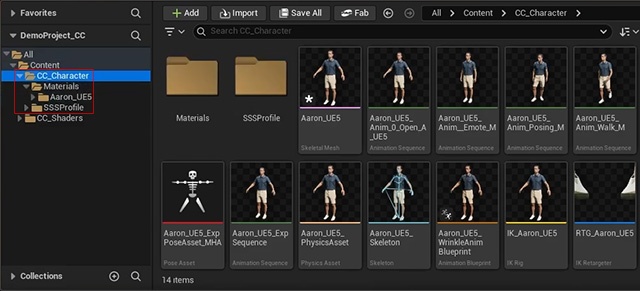
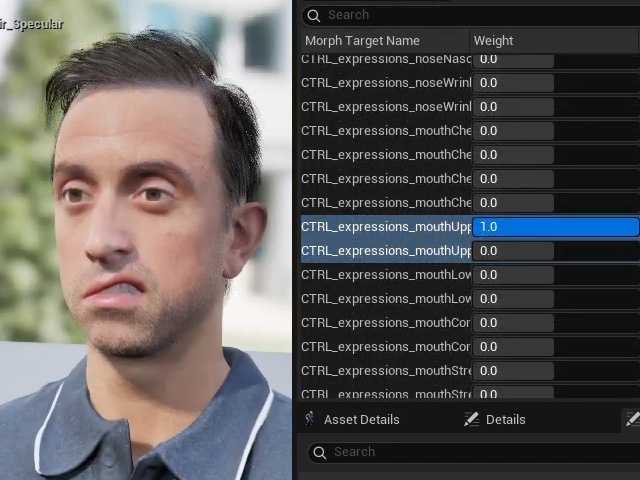
Reopen the skeletal mesh and inspect its morph-target list. A populated list is a useful first check, but a large total count is not proof of compatibility. For instance, our tested character rig generated 249 morphs; other characters may have a different total count. What matters is whether the specific targets required by the integration are present.
7. Validate the facial-animation contract
Although runtime code is outside this article, the asset must satisfy the downstream facial mapping. In our direct-morph mapping pipeline, 52 ACE facial inputs map to 54 CC5 target writes: 50 inputs map to one target each, while two inputs (inner brow raise and cheek puff) drive bilateral left/right pairs.
Two different integration approaches: NVIDIA’s public Unreal Renderer 0.1 guide describes a 52-frame ARKit animation, a Pose Asset, and an Animation Blueprint. Our pipeline uses project-owned C++ code that applies CC5 morph targets directly each frame. The 52-input / 54-write table below reflects this direct-morph mapping. Agree on the intended approach with the integration owner before preparing additional animation assets. Runtime implementation remains outside this article. [2]
| ACE Input & Index | Required CC5 Target(s) | Mapping Type |
|---|---|---|
EyeBlinkLeft / 0 |
Eye_Blink_L |
1-to-1 direct |
EyeBlinkRight / 7 |
Eye_Blink_R |
1-to-1 direct |
JawOpen / 17 |
Jaw_Open |
1-to-1 direct |
MouthSmileLeft / 23 |
Mouth_Smile_L |
1-to-1 direct |
MouthSmileRight / 24 |
Mouth_Smile_R |
1-to-1 direct |
BrowInnerUp / 43 |
Brow_Raise_Inner_L + Brow_Raise_Inner_R |
Bilateral pair (1-to-2) |
CheekPuff / 46 |
Cheek_Puff_L + Cheek_Puff_R |
Bilateral pair (1-to-2) |
TongueOut / 51 |
Tongue_Out |
1-to-1 direct |
The table is a review sample, not the complete mapping. Validate every entry in the complete 52-input mapping against the imported mesh. Preserve the documented spelling, capitalization, and input ordering in the handoff. In particular, eye look-in and look-out are relative to each eye: the reference maps EyeLookInLeft to Eye_L_Look_R, and EyeLookInRight to Eye_R_Look_L. Do not “correct” these names based on screen direction.
For an asset-level visual check, double-click the imported Skeletal Mesh in Unreal Engine to open the Persona mesh editor, and locate the Morph Target Previewer tab (accessible via Window → Morph Target Previewer if hidden). Drag the weight sliders from 0.0 to 1.0 for representative morphs: left and right blinks, jaw opening, smiles, the inner-brow pair, cheek puff, and tongue movement. Confirm that the geometry deforms cleanly, the correct anatomical side responds without inversion, and the teeth, tongue, and tear ducts remain visually intact. Reset all sliders back to 0.0 to restore a neutral resting face before saving. This manual preview is a deformation check, not evidence of a working ACE or Tokkio stream. [8]
Produce a target-by-target coverage report for the complete reference mapping, with no missing required targets. If a target is absent, first recheck the CC5 facial profile, expression export, and Unreal’s Import Morph Targets setting. Do not silently rename or skip targets to make a report pass.
8. Review the saved avatar, not just the import dialog
Inspect the neutral character in Unreal under useful lighting and a front-facing view. Check skin, eyes, eyelashes, clothing, and hair where present, and look for missing textures or unintended material assignments. Save the project assets and reopen them to confirm that the imported state persists. Keep a screenshot of the actual imported character and record its asset path.
Distinguish errors that affect this character from unrelated project warnings. A missing texture referenced by a CC5 material or a missing required morph is blocking. A warning about an unused sample asset may be unrelated, but it should be classified rather than ignored indiscriminately.
9. Common problems and where to fix them
| Symptom | Check and Repair Procedure |
|---|---|
| Export appears empty or 0 bytes | Check export folder file sizes and inspect any sibling .fbm directory. Re-export if the primary FBX or required material definitions are absent. |
| Textures are missing after transfer | Restore both the matching JSON and companion texture folder structure (CharacterName.fbm/ + textures/). Verify all referenced paths resolve. |
| Materials do not match intended setup | Confirm compatible Auto Setup installation in Unreal Engine, ensure RLPlugin is loaded, and use the JSON-assisted import dialog rather than a raw FBX import. |
| Character renders but facial targets missing | Recheck the CC5 CC4 Extended profile, verify facial-morph export was selected, and confirm Import Morph Targets is enabled in Unreal import options. |
| Many morphs exist but coverage fails | Compare actual morph target names in Persona against the complete 52-input mapping specification. Total count alone is not a valid pass criterion. |
| Expressions affect the wrong side | Review left/right anatomical naming and eye-relative look directions (e.g. EyeLookInLeft maps to Eye_L_Look_R). Preview affected targets individually. |
10. Hand off a reproducible avatar package
Deliver the complete FBX/JSON/texture bundle together with the saved Unreal project assets and their dependencies. Include a short manifest of tool versions, plugin compatibility, facial profile, export settings, import settings, skeletal mesh path, and the full morph-coverage results. Add a neutral Unreal screenshot and list any remaining limitations explicitly.
At this stage, we have defined and validated the avatar asset ready for consumption by downstream systems. The companion article will take this saved Unreal asset and implement the full runtime integration: